Monday 30 November 2015

Mini Card For You

Hello friends

Today a mini card in more detail, this was a card that featured in a workshop
recently that went inside this Christmas card wallet.


I've used the inner frame die cut from the cover Labels Forty Nine.
The beautiful curling corner holly foliage with mini poinsettias is from
5 x 7 Decorative Holly Fame - that die set is so useful!
The 'For You' is Phrase Set Two.


Again, I've embossed the envelope flap to make it pretty and special -
Santa's Sleigh M-Bossabilities folder.

Delighted to say that at the time of typing this everything I used is in
stock on the website, that is of course subject to change - 
that boy of mine is keeping pretty busy!

Take care friends - have a great start to the week.

Sunday 29 November 2015

Gift Bag - Burlap and Mini Poinsettias

Hello friends

Sometimes it's the simplest things that draw the eye and
this is definitely the case with my burlap and mini poinsettia gift bag.
This project has travelled up and down the country with me and it never fails
to receive comments.

First off a kraft gift bag, a sheet of 6 x 6 burlap card is then
affixed to the front - this burlap is from a DCWV paper pad - 
you get a whopping 24 sheets in each pad and
that boy of mine now has the paper pads on the website here.


Some canvas ribbon added.
The mini art canvas is from a set of 4 that you can purchase in Poundland!


I then drew around my removable tape to get a nice circle,
affixed multiple mini poinsettias and holly leaves to represent a wreath.
These mini poinsettias are from the 5 x 7 Holly Frame -
this die has become rarer than unicorn horns!
BUT pleased to announced that boy of mine has it back in stock here.
I'd be quick....


Loving that burlap, watch out I think that paper pad could remain on my craft desk
for quite a few projects!

Take care friends.


Saturday 28 November 2015

Darling Daisies Frame!

Hello friends

How about something bright and cheerful today.
Forget about those grey rain clouds and feast your eyes on...
daisies!

This is a project I created for The Craft Channel and it was to demonstrate
how many layers of card the Platinum machine can cut through using
Contour Steel Rule Dies -
I actually used six layers of 250gsm cardstock!


I used the Contour Steel Rule Die - Darling Daises,
the photo doesn't truly show the wonderful card thickness - it looks just
like a photo mount.   Also, excuse that shadow on the glass, really hard
taking photos of reflective items.

Behind the dots and daisies I placed
pretty patterned paper - Lawn Fawn - Let's Polka, Mon Amie.
Such a useful paper pad - I love the combo of tiny dots, stripes, hearts and
all in pretty pastel colours.

I also used these papers in the heart card below.
It appears that when a paper pad sits on my desk it gets used for multiple projects!

Just to confirm Contour Steel Rule Dies also work in other
die cutting machines - as long as they are machines that take
the thicker format dies.
Take care friends.


Friday 27 November 2015

Friday Die Day

Hello friends

Happy Friday Die Day!
This week I'm featuring Loop Roll Flowers, this is one of the
dies from the Amazing Paper Grace Collection.


The die set consists of 4 dies and the approximate measurements are:

Roll Flower Small: 4.50 x 2.00 inches
Roll Flower Large: 4.50 x 3.00 inches
Leaf Large: 2.40 x 1.30 inches
Leaf Small: 1.95 x 1.10 inches (5.0 x 2.8cm)

This is how they look cut/embossed.


When you use the dies to create the flowers you will see that you need to trim
the end sections away.  This is because, if you wish, you can extend the die to make
extra long/fuller flowers.

 
Once you have cut/embossed your flower strip, apply adhesive to one inner edge,
you are going to be folding this in half.
Tip: place a pen or something similar inside to keep the fold rounded.

 
Secure firmly down.
 
 
Switching to your Tool n' One begin to roll the flower.
 
 
Continue until you reach the end and secure with a dob of liquid glue.


I've chosen to decorate a Square Petal Top Box.
Added a length of ribbon and the die cut leaves from this set.


Placed my Loop Roll flower on top, you can keep tweaking these...believe me!
 
 
These flowers also look beautiful cut from felt, fabric, tissue paper and more.
 
 
Loop Roll Flowers is available on the website here.
 
Have a wonderful weekend - I'm heading up North again!
You can find me on Sunday at Garners Garden Centre - Stoke-On-Trent,
I will be demoing Spellbinders and there will also be a make and take.
 
Take care friends.


Thursday 26 November 2015

Winner - November Charity Kit

Hello friends

Stopping by with an important announcement today -
if you ordered a November Charity Kit then please rummage...
you should find a ticket and this is the winning number!


If you are the lucky winner then please email your address details to
creativity-continues@outlook.com

Goodies consisting of dies, stamps, adhesive and more will then
be whisked out to you.

So this time next month it will be Boxing Day...really!!
Every year it creeps up and suddenly it's here.
I have to confess I have only purchased one Christmas pressie 
so far and it is for...
Bella! 

And it just happens to be hidden away in this cupboard...


I'm not sure if she can stay there until Christmas :)

How's your festive planning going?

Take care friends.

Tuesday 24 November 2015

Simply Snowflakes

Hello friends

So if I was very very organised and had an eight day week this
is the Christmas card that I would be making for everyone this year.
It is my perfect recipe for simple, elegant and batch making.

It features the gorgeous Create A Flake Six and 6 x 6 Matting Basics.


Create your card base with the Matting Basics and attach a square of 
patterned festive paper - raid your scrap box for this.
Next, onto your cutting plate place white card, matching size Matting Basics 
die and largest snowflake inside.  Cut to create your aperture.
Attach to card front with 3D Foam Squares.
Using the the largest snowflake die cut offset and attach and 
apply the smallest snowflake to the middle.

You may be able to see from the photo that I've embossed just the flap of
the envelope - again something I like to do for that special touch.
I used Santa's Sleigh embossing folder - that boy of mine has it
so cheap on the website!

Every year I am thrilled to see the next Create A Flake die 
but I'm truly taken with this year's design.
I think it is because that smallest snowflake can easily be a 
flower too....


Create A Flake Six is available on the website here.

Take care friends - I hope you're keeping warm!


Monday 23 November 2015

Shiny shiny!

Hello friends

Shiny shiny hearts today!
A simple card using 3D Foam Hearts from Scrapbook Adhesives by 3L.


There's a really simple way of making them shiny and all the
details and a step by step tutorial can be seen here.


Feel free to leave a comment if you wish too :)


3D Foam Hearts are also available on the website here,
they are super useful and work with other mediums too.

Hope you all had a good weekend,
didn't it turn cold!  I've dug out Bella's jumpers, she was very happy
to put her paws up and wear one of them! 

Take care friends.

Sunday 22 November 2015

So Tweet!

Hello friends

Today something different, I have made a So Tweet book bag.
The die is one of the new Contour steel rule dies so it cuts all 
different mediums.  
Being a steel rule die it will be compatible with the Platinum machine 
and other machines that take thicker dies.

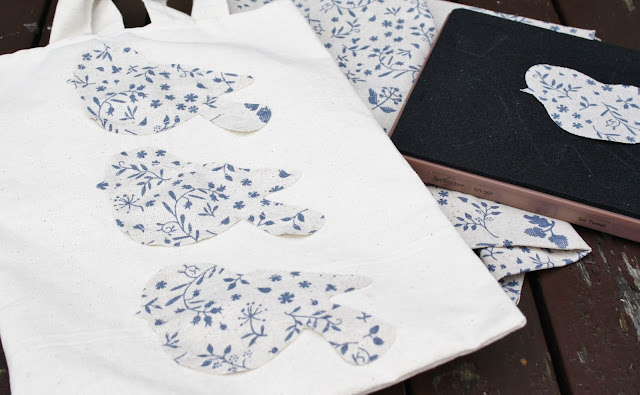
My bag is actually made from one of the Hope and Chances bags -
remember those?  I think they were in a charity kit about a year ago.
Anyway...I cut it down to make a smaller narrower bag, perfect for books
and perhaps a bar of chocolate, bag of crisps - essential reading materials.

The fabric is a fat quarter that I picked up locally.


Spellbinders have featured this project on their blog and 
you can view the step by step blog post here.

I'm enjoying doing the occasional bit of sewing although saying that...
I must get back to my teddy bear making - he is body-less at the moment!

Take care friends.

Saturday 21 November 2015

Cute or Mean? You decide...

Hello friends

Firstly - HUGE thanks for all the lovely Birthday wishes
and also to those of you who sent cards - so kind and
I'm always so touched when people I've met through blogland
are so thoughtful.

I had a wonderful day - perhaps a little too much food(!)
but that's what Birthdays are all about...next foodie stop Christmas!

Chocolate wrappers - I think possibly one of my signature design pieces,
I've certainly been doing them for quite a few years now
but this is my first time embarking on mini (and I mean mini!)
chocolate wrappers.

I was lucky to receive this treat box of Green and Black's 
chocolate bars and before I scoffed the lot I thought I would
make wrappers.
They would definitely work well on the Christmas table,
treats for work pals, even pop in the post.
The box looks a little mangled - it was my frenzied panic to get
to the chocolate!

The bars measure just a little more than an inch across so I needed a small design.  
Red cardstock, Graphic 45 - Travelogue papers, Classic Scalloped Hearts,
the little leaves are from Marisa's Bouquet and...


 the super popular mini poinsettias from 5 x 7 Holly Frame.
(Appreciate that is out of stock but due in soon hopefully,
it's been a tricky die to get hold of as it's been so popular - 
I think I may have had a hand in that!)


So is this size cute or is it mean?
My family may be hoping for larger chocolate bars
but I'm thinking this is probably enough after a huge Christmas lunch,
pudding and mince pies?
Goodness I'm obssesed with food in this post!

Today I'm demoing Spellbinders at Crafts Plus in Basildon,
be lovely to see you if you live local to there.


Take care friends - I'm back soon.

Friday 20 November 2015

Friday Die Day

Hello friends

So this is a change - going Summery at this time of year!
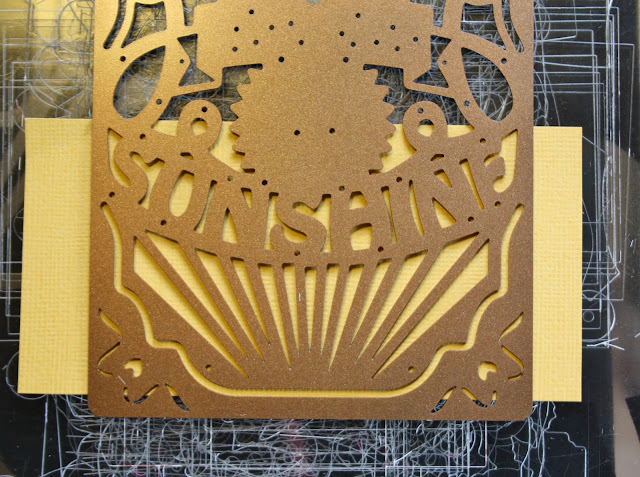
I thought I would share with you My Sunshine die set,
I fancied a bit of brightness as today is....
my birthday!

This is one of the card front dies so you receive an outer 
rectangular border die along with the inset.
The approximate sizes: Inset: 4 x 5¼” Border: 4¼ x 5½”

This is how it looks cut/embossed from white cardstock.

I then chose to cut/emboss certain areas of the die so I placed my yellow
card just on that part.  

Cut/embossed.


Using my Tool n' One I was able to remove the yellow fallout pieces I needed
and insert them, just a dab of liquid glue holds them in place.
Tip:  Attach a strip of card to the reverse of the section where you
are inserting pieces so you have something to adhere to.


My pieces inserted.


Using that outer border die I cut a piece of green patterned paper.
Attached 3D Foam Squares to the reverse of my die cut and 
positioned over the top.


I added Sprigs and tiny flowers and Adhesive Pearls,
it's a really a simple make with the card front die doing most of the work.


Some close up pics.


My Sunshine is available on the website here
and the ever popular Sprigs is here.

Right - I'm off to do a bit of celebrating today, a trip to Bluewater shopping
is on the cards and then a takeaway with the family this evening.

Take care friends - I'm back tomorrow.